Blogging with Jekyll

Before we start, I will make clear the prerequisites to continue this post. First, you need to have a static site in HTML and CSS, then, you need to install Ruby and Jekyll in your environment, I have already posted about how to install the two things, so if you haven’t done that yet, click on the following links:
Now we can start. First of all, we need to understand how we will organize our directory, I will give you a example and then I will comment about it.
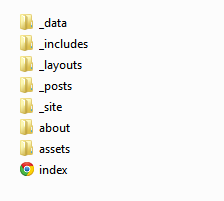
The function of each directory:
- _data: This is where your YML files with data will be.
- _includes: These are the partials that can be mixed and matched by your layouts and posts to facilitate reuse.
- _layouts: These are the templates that wrap posts.
- _posts: Your dynamic content.
- _site: This is where the generated site will be placed.
- about: This is a example of a page, inside of this directory there is a “index.html”.
- assets: Contains all the CSS and images of your website.
And on the root, we have the “index.html” of your website. You can creat a “config.yml” to set all alteration of configuration you want, but sometimes it isn’t necessary, because it has a default(see the documentation).
Ok, now we need to understand how Jekyll works: Jekyll takes a template directory containing raw text files in various formats, runs it through a converter (like Markdown) and a Liquid renderer, these raw files uses a thing called “YAML Front matter”, but, what is it?
YAML Front matter is where you can set predefined variables or even create custom ones of your own, the front matter must be the first thing in the file and must take the form of valid YAML set between triple-dashed lines. See the following example of a front matter:
 ---
 layout: posts
 title: "Blogging with Jekyll"
 ---
In this example I’m setting the layout and the title of this post, but there are a lot of other things to set. See the predefined variables on the documentation. Why this is necessary? Because this facilitate your work and you need to modify something, for example, the title will appear in a lot of places, instead of modifying at all places it appears, you just modify on the front matter. Later on this post you going to learn how to use liquid variables.
After learning how to use front matter, you can create a post, but how? You will create a file on the “_posts” directory, with the name according to the following format: YEAR-MONTH-DAY-title.MARKUP
You need to remember two thing, first that all blog post files must begin with Front Matter, and second, all your posts file are written in MarkUP language, I recommend MarkDown, but you can use others MarkUP language with the proper text-to-HTML conversion tools. After doing your posts, you can display them on the index, here is a simple example of doing this:
<ul>
  {% for post in site.posts %}
    <li>
      <a href="{ post.url }">{ post.title }</a>
    </li>
  {% endfor %}
</ul>
After learning how to create posts, let’s learn about pages. Do you remember a directory called “about” on the structure I’ve showed you? Yeah, that was a page, I have told you that there was a “index.html” file inside it, so, it is basically like this. On this “index”, you can put some front matter to set the layout and other things you want. Easy, no?
Other thing about creating pages like that, is that the page’s url will be the name of the page’s directory. For more information, go to the documentation about pages.
Before I start to talk about includes and layouts, I need to talk about Liquid template system. Liquid gives you a lot of variables that facilitate the maintenance of your website, and helping to transform your static website into a dynamic website. You can see all the variables on the documentation. There are control statements on liquid too, like the “for” you have seen on the example of displaying your posts.
So, what is layouts and includes? They are pieces of HTML that don’t change, for includes we have, for example: headers, footers, sidebars. You can create layouts for each page, for the home, posts, about, or you can create a default layout for all the pages. You will use a lot of liquid variables on these files, and you need to use those variables on other file to make it work. For example, you have created the header, so you need to include it on the “index.html”, how you are going to do this? Simple…
{% include header.html %}
And you’re going to do this to all your includes. Go on the page of templates of the documentation and see what you can do with them.
Finally, about the “_data” folder, you will use it for additional data, creating .yml files. An example it’s creating a author file, with the website’s author data.
`
- name: Mateus Jabour social: facebook: http://facebook.com/mjabourbp twitter: http://twitter.com/mateusjabour instagram: http://instagram.com/mateusjabour `
Those are my social information, but now you are going to ask me, “how I use this?”, you can acess this file using liquid, on this case, will be the variable site.data.author(name of the file: “author.yml”), using a “for” statement, you can use all the data file…
{% for author in site.data.author %}


<small>{{ author.name  }}</small>
<ul class="social-media">
    <li>
        <a href="{{ author.social.facebook }}" target="_blank">Facebook</a>
    </li>
    <li>
        <a href="{{ author.social.twitter }}" target="_blank">Twitter</a>
    </li>
    <li>
        <a href="{{ author.social.instagram }}" target="_blank">Instagram</a>
    </li>
</ul>


{% endfor %}
These is basically the footer of this website, simply using a data file, and you can use this file wherever you want. The page of data files on the documentation show other way of using data.
So basically you can create you’re own website with Jekyll, and blog with it. If you have any doubts about this tutorial, talk with me on Facebook or Twitter, and take a look at the full Documentation.